


Build the latest and greatest bass rod on the market—the Elite-X NMB873.5-MHX is the high-performance fishing rod that’s unbelievably light with superior sensitivity and unmatched strength.
How to Build the Ultimate Bass Casting Rod
The Elite-X Series of rod blanks from MHX is truly the next generation of performance driven designs in the fishing rod market. This lineup includes the most advanced rod blanks available, incorporating Mitsubishi Rayon 12K High Modulus Fiber of 57 million modulus and featuring a tensile strength of over 442 KSI.
The saying for the Elite-X Series goes, “Where Technology Meets Application,” because each blank is engineered to excel in certain fishing applications, like bass, inshore, walleye, and trout, as well as with specific techniques and lures, such as finesse, flipping, and popping, or shakey heads, jerkbaits, and spinnerbaits.
From the engineering of the Elite-X line, to perfecting their performance potential, MHX worked diligently to develop the new leading rod blank for hardcore professional fisherman and weekend warriors alike.
Now let’s start building one of the most popular models for bass—THE Elite-X NMB873.5-MHX!
The Ingredients: Elite-X NMB873.5-MHX Casting Rod
— The Rod Recipe —
– 7’3” MHX Med-Heavy Elite-X Rod Blank – #NMB873.5-MHX
– MHX WinnDry Black Split Grips – #MHX-FSG387-BK
– MHX WinnDry Black Fighting Butt – #MHX-SGFBE-BK
– Fuji ACSM Trigger Reel Seat – #ACSM-125-B
– Tapered Rubber Winding Check – #TWC16-12.0
– CRB Arrow Drop Shot Hook Keeper – #ARHK-GS
– CRB LZR Gunsmoke Casting Guide (1) – #GCZG-8
– CRB LZR Gunsmoke Running Guide (1) – #GRZG-6
– CRB LZR Gunsmoke Running Guides (8) – #GRZG-5
– CRB LZR Light-Duty Tip Top Guide – #GLZT-5-5.5
1. Start with the MHX Rod Blank
You may recognize the popular MB873 root of the new NMB873.5-MHX and notice is a half power closer to the equally popular MB874… There’s a good reason for that!
Since the Mag Taper MB873-MHX and MB874-MHX are already well established for their versatility across bass fishing applications, MHX redesigned the NMB873.5 to bridge the gap between the two powers for an unreal performance on the water. Amongst the reviews of professional fisherman on tour and avid anglers fishing MHX rods, there was a noticeable gap between the MB873 and MB874. The MHX rod designers took this gap as room for a new model and got to work.
By beefing up the butt to a heavy power, and then adding to the mid-section for a true heavy to medium-heavy power transition going up from the butt, the NMB873.5 retains the popular fast action tip flex, yet adds the perfect power for increased versatility and enhanced performance.
Besides, there is no better time to introduce a product solution like the NMB873.5 than while you’re already developing the new flagship rod of MHX!
In addition to the performance, don’t count out the platinum gray finish… Oh, wow:
![]()
Unlike factory rods, the point of rod building is to ensure the rod is built right from the start. With the Elite-X rod blank selected, you can now find the spine by placing the butt end on a flat surface and flexing the upper half of the blank.
The spine will be the most pronounced “backbone” of the rod blank. In other words, the spine is the most comfortable bend for the rod that in return gives you the maximum power and fish fighting ability.
Mark the spine with a china marker (#FC5), and align the rest of your components based on this mark. For example, this is a casting rod so the reel will go on the topside of the blank just like the eyes of your guides.
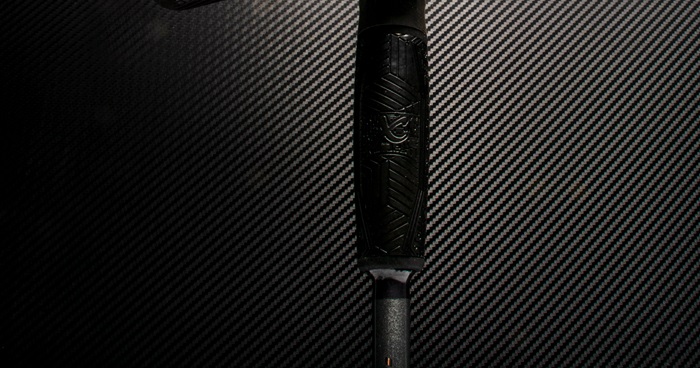
2. Next Install Your MHX Winn Grips
Since we’ve chosen a versatile blank capable of handling a wide range of demands in bass fishing, it only makes sense to go with the weatherproof fishing grips to match.
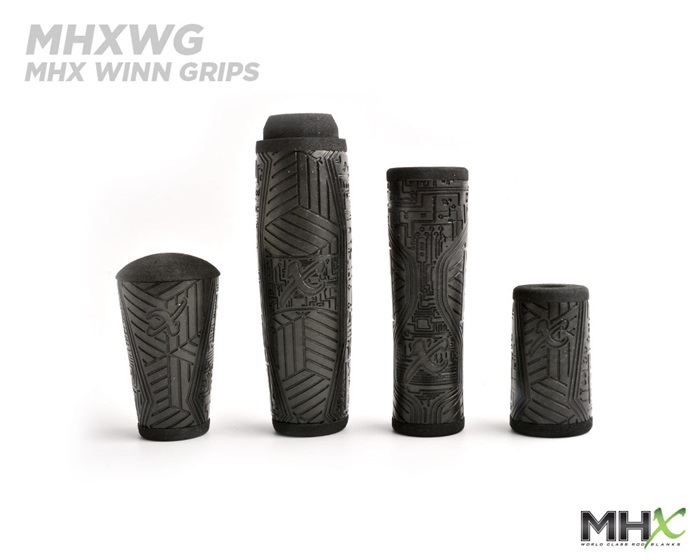
These updated all black MHX Winn Grips rely on Winn’s patented WinnDry polymer material to provide a sure, non-slip texture that thrives against all weather conditions.
MHX Winn Grips look as good as they feel, which is the best bonus on the water!
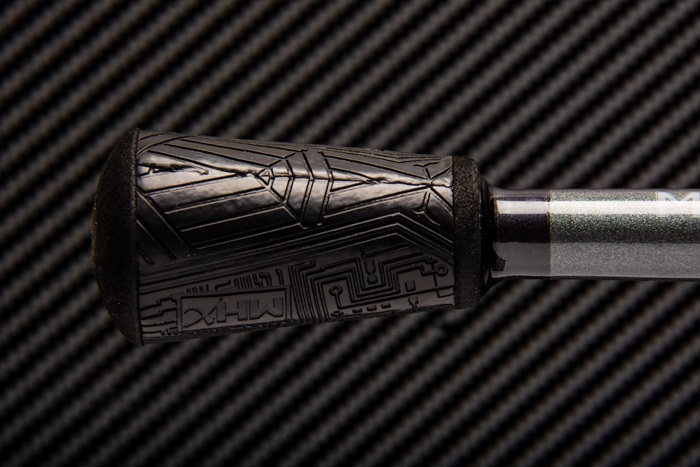
To install the grips, start by fitting each split one to their location on the rod blank. For instance, the fighting butt must fit snugly over the butt of the blank, so you can ream out material from the grips to reach the appropriate inner diameter for the outer diameter of the rod blank.
Try CRB’s Extreme Reamers (Available as Single Size Reamers, or as a Complete Set of 4 Reamers) for the long-lasting reamers you can even chuck into a drill!
As far as the rear grip, slide on the ECSM reel seat from the tip down to where it fits with the blank exposed. You can mark the start and stop of the reel seat with the china marker.
Use these bottom mark of the reel seat as a marker for the top of the rear grip. Remember, the tenon of the rear grip fits into the reel seat—make sure the tenon is facing the reel seat for installation.
Ream the rear grip accordingly to the fit the rear grip on that bottom reel seat mark.
Now, mix together equal measurements of the ProPaste Epoxy resin and hardener, then spread some on the inside of the fighting butt with a popsicle stick and twist the fighting butt onto the butt of the rod blank into place.
For the rear grip, apply some ProPaste on the grips proposed location as well as slightly above to provide a lubricant to help slide the grip into place permanently.
TIP: Line up the rear grip so that the “X” from MHX is facing up and the fighting butt with the “MHX” legible along the side.
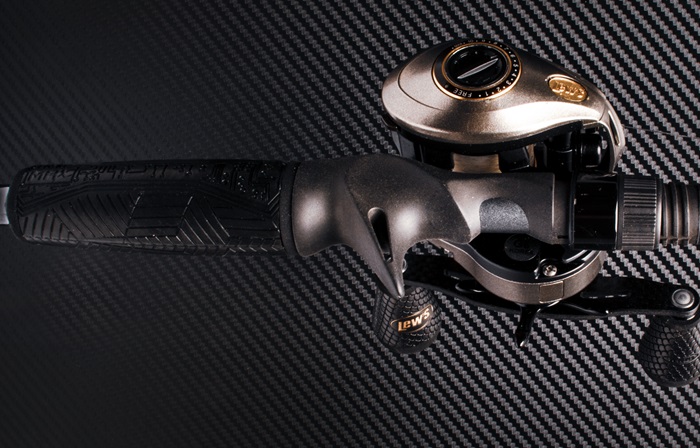
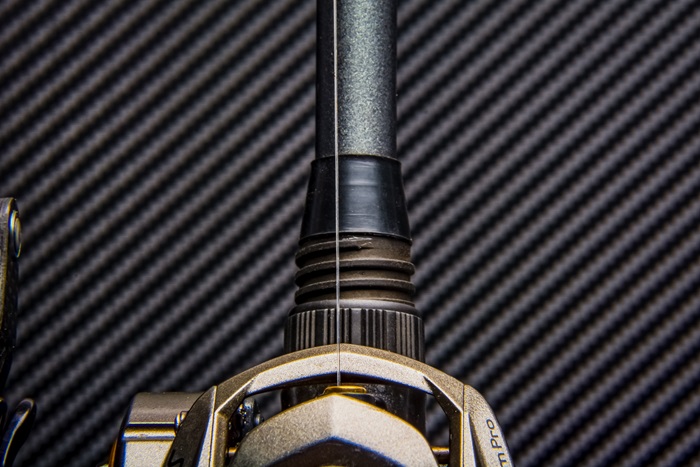
3. Then Mount the Exposed Reel Seat
With the split grips in place, it’s time to mount the reel seat. Since it is an exposed blank reel seat, we have determined the exact size (#ACSM-125-B) to fit in place on the NMB873.5-MHX rod blank’s handle.
For help sizing an exposed reel seat and winding checks on your future builds, use our MHX Dimensions PDF for assistance!
Apply a thin layer of ProPaste Epoxy about an inch to an inch and half above the rear grip’s tenon as well as a separate layer towards the top of the reel seat. Then, slide the reel seat firmly in place, while also making sure the reel seat is aligned appropriately with the spine of the blank.
Quick Break to Clean Up the Build
Chances are between the grip and reel seat installation, you might have some excess epoxy emerging from underneath these components. Use isopropyl alcohol and a paper towel to wipe off any excess epoxy from the blank, grips, and reel seat, especially the exposed portion of the blank.
4. Slide on the Winding Check Afterwards
Considering this casting rod’s handle doesn’t use a foregrip, let’s put a winding check above the reel seat to make the handle look and feel better. Similar to the reel seat, the winding check (#TWC16-12.0) has already been sized to fit.
First off, use masking tape (#NMT) to protect the threads of the reel seat from any emerging epoxy. Then, apply a small amount of epoxy just above the reel seat and move the winding check down into place.
Again, you can clean up any excess epoxy with isopropyl alcohol, and then remove the protective tape from the reel seat once clean.
Give the epoxy paste within the handle components time to cure before moving on to the hook keeper and guides.
Congrats! Your new high-performance handle is complete!
5. Space, Wrap, and Finish the CRB LZR Guides
Once you’re ready for the guides and hook keeper, start spacing out the guide train.

For quick and easy guide spacing, use the MHX Guide Spacing Chart for CRB Guides!
Use the guide spacing row for a 7’3” MHX rod blank with “Elite” CRB guides to mark the location of each guide. These marks will be the location of the bottom tip of each guide foot.
Wrapping guides isn’t difficult, but it can take some practice and extra assistance.
For instance, you can use masking tape to hold larger guides in place and guide tubing (#GT) for smaller running guides. This trick allows you to attach each guide without the headache of physically holding the guides in place AND wrapping the guide foot with thread.
Now that the guides are spaced and secured for wrapping, choose your thread; ProWrap’s ColorFast and Nylon are popular options because they look great and they are easy to work with. We have chosen a nylon thread (#RNS-B-831) with the color code 831 Smoke Screen to blend subtly with the rod blank’s finish.
For thread wraps, use an HWS-1 Hand Wrapper, which is the perfect, convenient companion to complete both basic and advanced thread wraps.
So, let’s get to wrapping!
For a refresher course on wrapping guides, watch this video tutorial:
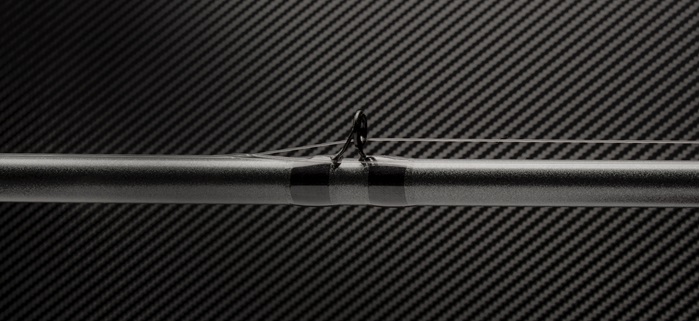
Once your guides are wrapped, we should go ahead and attach our hook keeper (#ARHK-GS). This location is up to you, but we’ve put the arrow hook keeper about an inch and a half above the end of the winding check, or roughly two inches from the top of the reel seat.
![]()
This will help hold hooks and even preserve your plastics for next time!
Since the guides are all lined up, now is a great time to add your LZR Tip Top with Tip Top Cement. Cut a small sliver and slip it inside the tube of the tip top, and then, wave a lighter underneath to subtly heat and melt the adhesive inside the tube.
Then, twist the tip top a full 360 degrees into place on the rod tip, making sure it is aligned with the guides.
After wrapping the guides and hook keeper, it’s time to apply epoxy finish. We recommend a two-part epoxy, like ProKöte, for finishing your thread wraps.
Since it is a two-part epoxy, ProKöte must be mixed together thoroughly with equal parts resin and hardener to provide a crystal clear, fully cured finish.
Just chuck your rod into the RDS Rod Dryer to begin finishing.
Next, mix together equal parts of your ProKöte epoxy by churning the mixture slowly—periodically switching from clockwise to counterclockwise. For the best mixture, this process should take 5-6 minutes of consistent, but not fast mixing.
Apply epoxy to each thread wrap as the rod rotates on the rod dryer.
TIP: Make sure this is in a location made for working—DO NOT apply epoxy over the dining room table unless you’ve previously consulted your significant other on the matter.
Or, watch our instructional demonstration on epoxy finish:
If you want a more tips for applying epoxy finish, read our blog: 4 Ways for Better Epoxy Finish!
After applying epoxy finish, let your rod rotate on the dryer for a full 24 hours to ensure the epoxy is completely cured and ready for the water.
Go Fishing—Catch Your Next Trophy Bass like Bob!
After building his Elite-X NMB873.5-MHX Casting Rod, Bob could feel the performance potential and had to test it out…
Needless to say, its superior sensitivity and strength proved itself in not time!
This is one incredible fishing rod that you have to build to believe…
![]()
Build Your Elite-X NMB873.5-MHX Casting Rod Now:
— The Rod Recipe —
– 7’3” MHX Med-Heavy Elite-X Rod Blank – #NMB873.5-MHX
– MHX WinnDry Black Split Grips – #MHX-FSG387-BK
– MHX WinnDry Black Fighting Butt – #MHX-SGFBE-BK
– Fuji ACSM Trigger Reel Seat – #ACSM-125-B
– Tapered Rubber Winding Check – #TWC16-12.0
– CRB Arrow Drop Shot Hook Keeper – #ARHK-GS
– CRB LZR Gunsmoke Casting Guide (1) – #GCZG-8
– CRB LZR Gunsmoke Running Guide (1) – #GRZG-6
– CRB LZR Gunsmoke Running Guides (8) – #GRZG-5
– CRB LZR Light-Duty Tip Top Guide – #GLZT-5-5.5
![]()
Credit: Source link


