The author’s original pattern went viral on social media a few years ago.
All photos by Steve Cobb
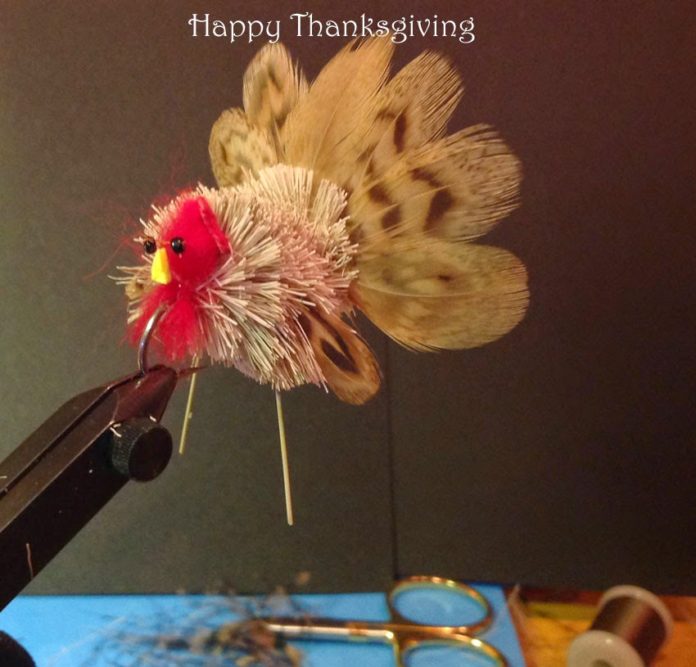
Steve Cobb’s Santa Fly has been a favorite on this blog for a few years now, and he was kind enough to show us how to tie it a couple years ago. That post was such a big hit that I asked Steve to come back and walk us through his Thanksgiving Turkey Fly. Whip up a few of these over the next week, and you’ll be the star of your holiday gathering!
Steve Cobb lives and fishes in Upstate New York, on the northern edge of Adirondack Park. You can follow him on his blog at QuietRaquette.com.
Turkey Fly
Hook: Stainless steel hook, size 1/0.
Thread #1: Brown, 6/0.
Body: Natural brown deer hair.
Wings: Brown or tan soft hackle saddle feathers.
Legs: Tan round-rubber legs.
Adhesive #1: UV-cure resin.
Tails: Brown or tan soft hackle saddle feathers, glued at bases.
Adhesive #2: UV-cure resin.
Thread #1: Red, 6/0.
Head / beard: Red zonker strip (1/8″ wide).
Beak: Yellow sheet foam.
Adhesive #3: Superglue or head cement.
Eyes: 5X tippet and Small black glass beads.
Adhesive #4: Superglue or head cement.
Tools: Sewing needle

1. Start thread at hook point and take a few wraps.

2. Spin clumps of deer hair to about half way up the hook shank…pack it tight.

3. Cut the bottom hair even with hook point.

4. Cut the top hair slightly longer than bottom.

5. Square off the sides.

6. Tie in a wing feather on each side of the hook, with the feather tips pointing slightly downward. Trim the corners of spun the hair, to make the body rounder.

7. Spin some more deer hair to about 3/4 up the hook shank, packing it as you go Trim it to blend in being careful not to cut off a wing. (Curse because you cut off a wing.)

8. Fold a length of rubber leg material in half and tie in on top of hook.

9. Grab the legs and work them back into the trimmed hair, to keep them out of way.

10. Spin and pack some more hair until almost to the hook eye.

11. Put some UV-cure resin on the hair on the topside of the hook and work it upwards with your finger. (Swear because you’ve got glue and feathers and deer hair all over your finger.)

12. Hit it with your light to cure it. This creates a base for the tail feathers.

13. Now’s your last good chance to do some final trimming and shaping. (Curse because you just cut off a leg.)

14. Make a tail assembly by gluing five feathers together at the bases. Cut a little notch in the bottom center.

15. Glue the tail assembly to the body and the hook shank.

16. Spin one more bunch of deer hair, and tie it off at the hook eye. It’s easiest (Ha!) to flip the hook over and spin the hair from the bottom side.

17. Turn the hook around, clamping the hook eye in the jaws of the vise.

18. Tie off the brown thread, and cut it. Put some UV-cure resin on the hair above the hook and work it upward with your finger. Hit it with the light.

19. Tie in the red thread. Cut a 1/8-inch-wide piece of red zonker, a little longer than the height of the body.

20. Work the fibers down from the hide, then split them.

21. Place the zonker head on top of the hook and tie it in.

22. Tie wraps around the top of the zonker head, like a post. Tie off with a couple half hitches. (Catch the hook point between the thread and your finger, then tighten.)

23. Trim zonker beard on the bottom side of the hook.

24. Cut a triangle from a sheet of yellow foam.

25. Glue the beak to the front of the head.

26 Select two glass beads of the same size.

27. Thread the bead on a pin and put a drop of glue on the point.

28. Position the tip of the needle on the head and push the bead off the needle.

29. Add the second eye.

30. Trim the legs. Give thanks: you’ve got yourself a Gobbler Fly.
Credit: Source link
